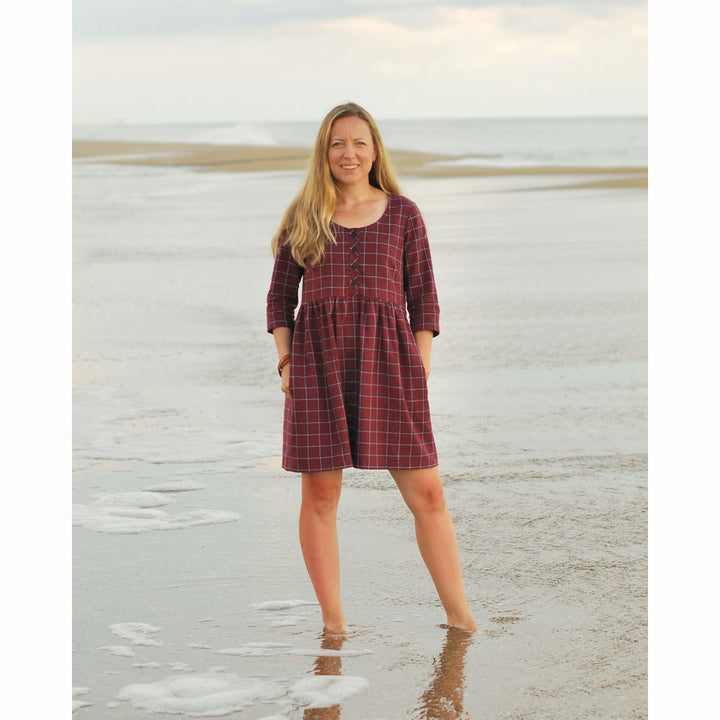
Hello, It’s Jessamy from JessamyBMakes, and I am so excited to show you my Fall Hinterland dress!

I often daydream about Fall in the heat of the summer. I start longing for cooler days filled with plaid shirts, sweaters, and dresses paired with boots and tights. So when I saw the new fabrics coming into the shop, my mind was immediately filled with Archer Shirts and Cheyenne Tunics galore. But then I thought…why not a dress? So I decided to use this beautiful Burgundy Windowpane Shirting for a Hinterland Dress by Sew Liberated. The Hinterland has been on my “must make” list since the pattern came out, and I was so excited to finally sew one up in time for Fall.
Let me start by saying that this fabric is amazing! The beautiful burgundy color is what first caught my eye, but the color has nothing on the texture...which I didn’t realize when picking it out. When you get this fabric in your hands, you’ll see that it's woven with a tiny herringbone pattern. The fabric washes up so soft and hardly wrinkles! It was so easy to work with, and is even more comfortable to wear. It’s lightweight, but feels like your favorite soft flannel…what more could a girl ask for?!

The Hinterland is a great staple boxy dress. It comes with a lot of options, making it great for year round wear. From sleeveless to 3/4 sleeves, short to long, you can mix-and-match the styles to make many different dresses.
For this Fall-inspired version, I choose the 3/4 sleeves and to keep it from looking too “Little House on the Prairie”, I went with the shorter length. I used the pattern guidelines for the short style, and I’m surprised by how short it actually is! Just keep that in mind when you are choosing a hem length, make sure to check the measurements before you cut to make sure it will be long enough for you! I typically have to take length out of a pattern, often in the bodice and the skirt, but I did not shorten this version at all. I’m 5’1” for height reference.

I did have to make a few adjustments to the bodice. The pattern is drafted for a C cup, which I am not, so I did my typical SBA. After sewing up a muslin I also noticed some drag lines across my upper chest. I found that the seam lines of the shoulders were hitting me behind the center of my shoulder, subsequently pulling the dress to the back. I decided to do a forward shoulder adjustment to help remedy that. I’ve never done this type of adjustment before, but found it very easy, and I’m very pleased with the overall fit of the bodice now. Even though the Hinterland is a boxy style dress, the top is slightly fitted, and I’m glad I took the time to get the fit right.

Also, did I mention it has pockets? Pockets and boxy dresses go together like peanut butter and Nutella (in my house at least). I love the 3/4 sleeves and pockets on this dress. Something about being able to tuck your hand into a nice roomy pocket makes me think of those cool morning walks in the fall. I think this dress will be perfect paired with tights and boots once it cools off, and it kept me nice and warm on a cool morning at the beach.

I thought it might be helpful to offer a few quick tips for working with plaids, checks and windowpanes if you are new to them. My main tip is, don’t stress too much. No one will ever know if you’re seams are not perfectly matched with the pattern! That being said, here are three easy things you can do to help perfect your plaid matching game.
My first tip is to cut out your pattern in a single layer. This means that if you have pattern pieces that are cut on the fold, you would have to trace out a mirror copy of it and tape them together. It is an extra step, but if you are really particular about your lines matching up, it is a much easier method than trying to keep the pattern lined up with the fabric on the fold.

Secondly, use the pattern markings to help guide your placement of the pieces on the fabric. Most patterns will have the grainline marked on the pattern piece. When I trace off the pattern I often extend this line to run the entire length of the pattern piece. Then, you can use the grainline marking to line up the pieces along a line or bar on the fabric. It is usually best to center bodice and sleeve pieces along a line repeat as well. Follow the same method to line up the hem of the bodice or sleeve on a prominent line/bar repeat.
Once you have a pattern piece placed on the fabric I find it helpful to go along the seam line and mark in the plaid repeats along the pattern piece. This way, when you go to cut the second pattern piece, you have additional markings to help make sure you cut a mirror image of the first piece. This is especially helpful if you are making a dress or a button-down shirt when you have two fronts. If there is any place where you want to make sure you have patterned matched your plaids, it will be here!

Lastly, when you are sewing your garment, make sure to pin! I often skip pinning when sewing something simple like a straight skirt, but in this case I wanted to make sure the bars in my fabric were aligned along the side seems, so I made sure to pin before sewing, lining everything up.
I hope some of these tips help you feel more confident when tackling your next plaid project! It can be intimidating, but if you take your time with cutting, the whole process is so much easier!